
How to Use KP Authore Box Plugin – Complete Setup Guide
Learn how to install, set up and use KP Authore Box plugin to display a clean and responsive author box on your WordPress posts and pages with custom author data, avatar, bio, website and social media links.
What is KP Authore Box Plugin?
KP Authore Box is a simple and responsive WordPress author box plugin created to help website owners show a professional author profile section on WordPress posts and pages. With this plugin, you can display author name, job title, biography, avatar, website, email and social media links in a clean layout.
The plugin is useful for bloggers, content writers, business websites, guest post websites, news websites and WordPress developers who want to add a beautiful author bio box without editing theme files or writing code.
KP Authore Box supports both default WordPress author data and custom author data. This means you can either use your WordPress user profile information or create your own custom author profile directly from the plugin settings.
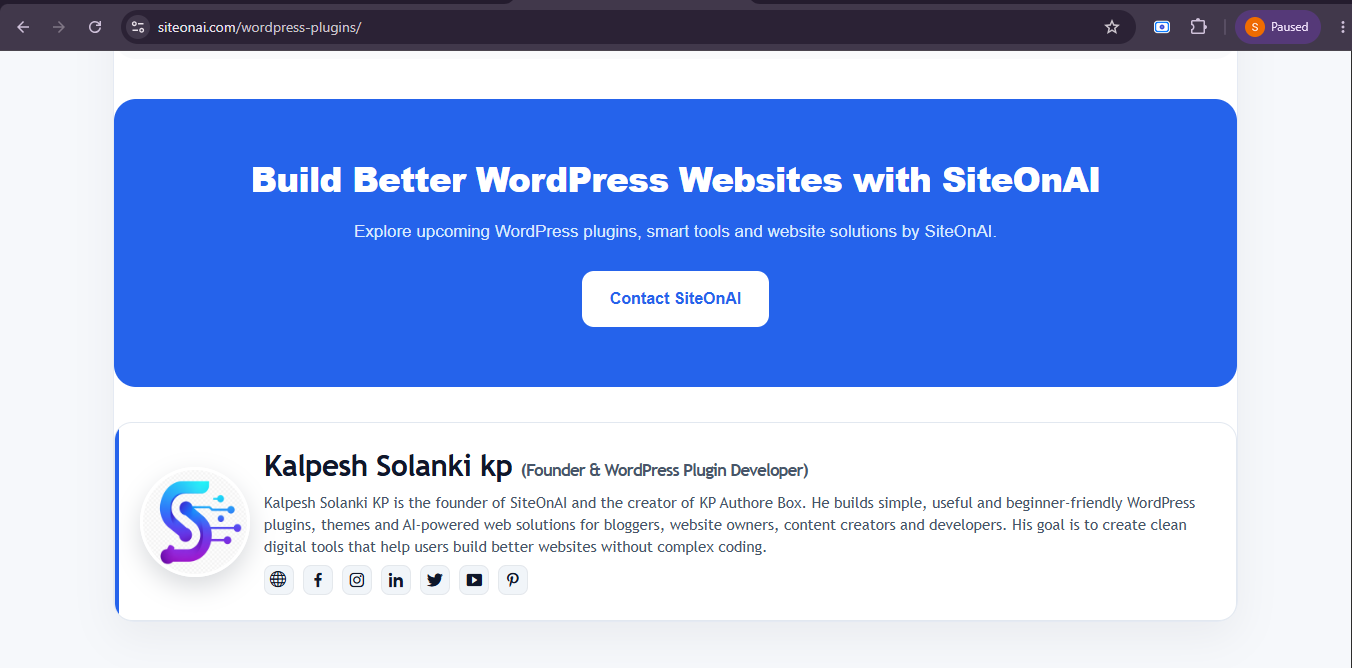
Main Features of KP Authore Box
KP Authore Box includes all important features needed to create and manage an author box on WordPress.
Add custom author name, bio, job title, avatar, website, email and social profile links.
Use default WordPress profile data when you do not want to create custom author data.
Preview your author box design while editing plugin settings inside WordPress admin.
Show author box on posts, pages or selected content according to your requirement.
Add social icons for website, email, Facebook, Instagram, LinkedIn, Twitter/X, YouTube and more.
The author box works properly on desktop, tablet and mobile screens.
Step 1: Install KP Authore Box Plugin
Open WordPress Plugins Page
Go to your WordPress dashboard and open Plugins → Add New.
Upload Plugin ZIP File
Click on Upload Plugin, choose the KP Authore Box plugin ZIP file and click Install Now.
Activate Plugin
After installation, click Activate Plugin. Once activated, the setup wizard will open automatically.
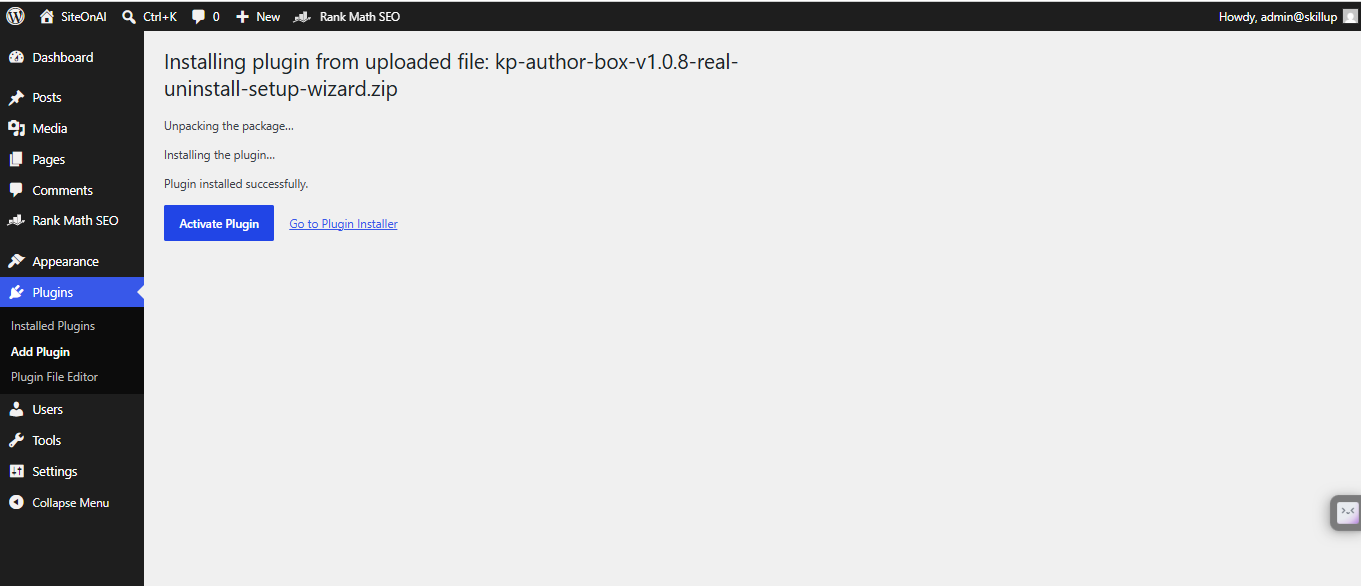
Easy Plugin Installation
Upload the KP Authore Box plugin ZIP file from WordPress admin, install it and activate the plugin in just a few steps.
Step 2: Complete Setup Wizard
After activating the plugin, KP Authore Box opens a setup wizard. This wizard helps you configure basic settings quickly.
- Select whether you want to use WordPress data or custom author data.
- Choose where the author box should appear.
- Select basic design and display settings.
- Save setup to apply your selected options.
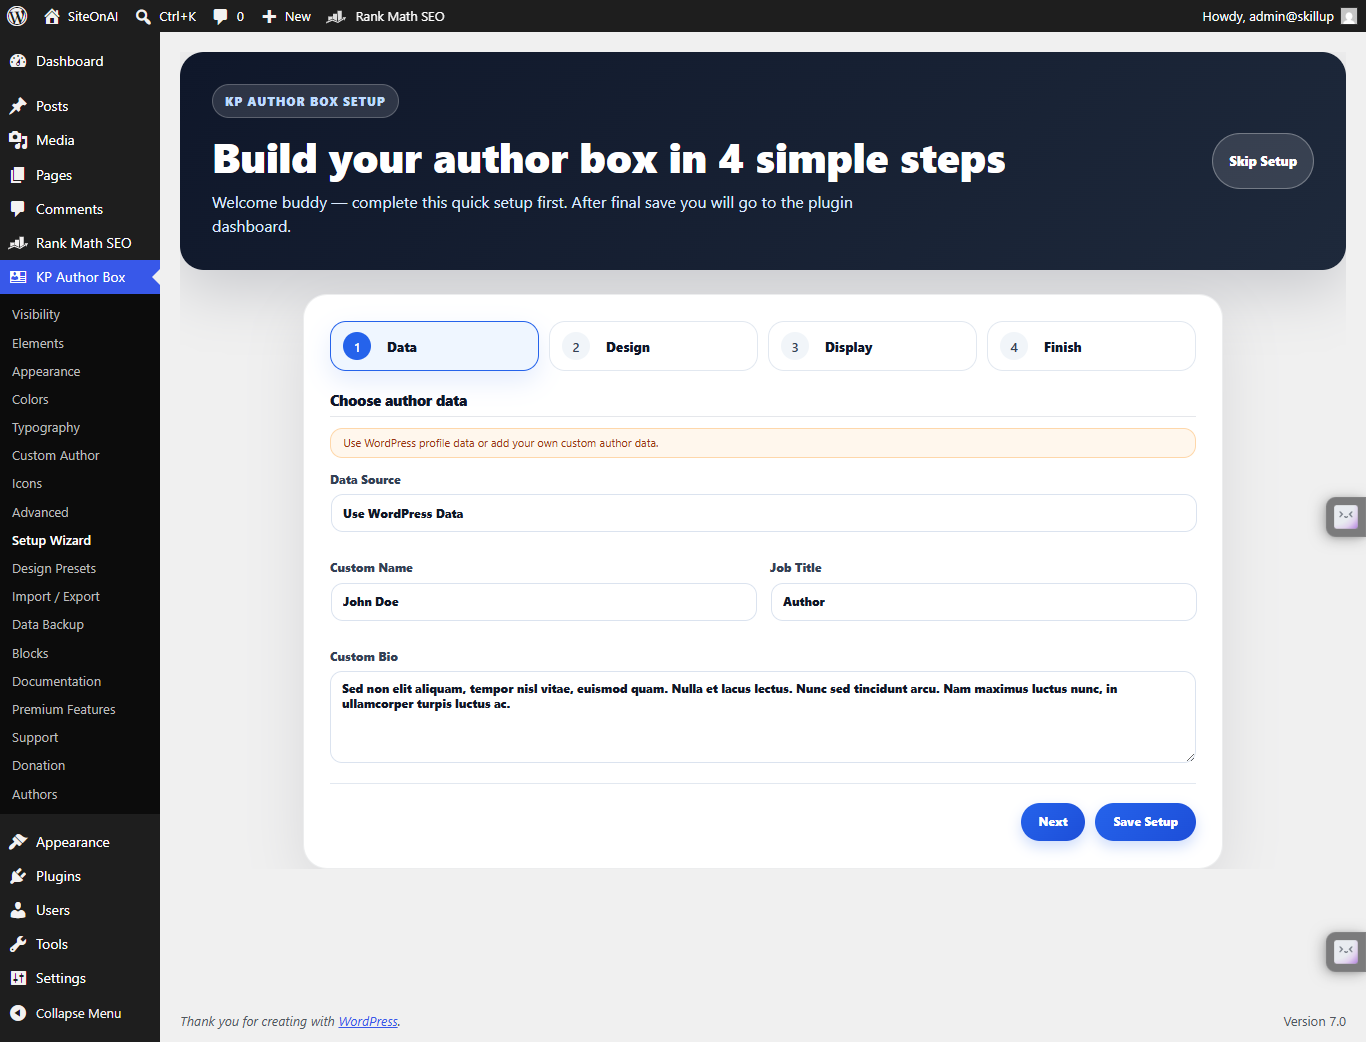
Setup Wizard
KP Authore Box includes a simple setup wizard that helps users configure the plugin quickly after activation.
Step 3: Choose Author Data
KP Authore Box gives you two author data options: WordPress profile data and custom author data.
Use WordPress Data
Select this option if you want the plugin to use your WordPress user profile data. The plugin can show the author display name, bio, website and avatar from the WordPress user profile.
Use Custom Data
Select this option if you want to manually add custom author details. This is useful for guest authors, brand profiles, company authors, team authors or plugin creator profiles.
Recommended Custom Author Data Example
You can use data like this:
Name: Kalpesh Solanki KP
Job Title: Founder & WordPress Plugin Developer
Website: https://siteonai.com
Bio: Kalpesh Solanki KP is the founder of SiteOnAI and the creator of KP Authore Box. He builds simple, useful and beginner-friendly WordPress plugins, themes and AI-powered web solutions for bloggers, website owners, content creators and developers.
Step 4: Configure Visibility Settings
Visibility settings control where and how the author box appears on your WordPress website.
- Auto show author box: Enable this if you want the author box to appear automatically.
- Manual shortcode mode: Enable this if you only want to display author box using shortcode.
- Author box position: Select before content or after content.
- Show on posts: Enable this to show author box on blog posts.
- Show on pages: Enable this to show author box on pages.
- Hide on archives: Recommended ON for clean archive pages.
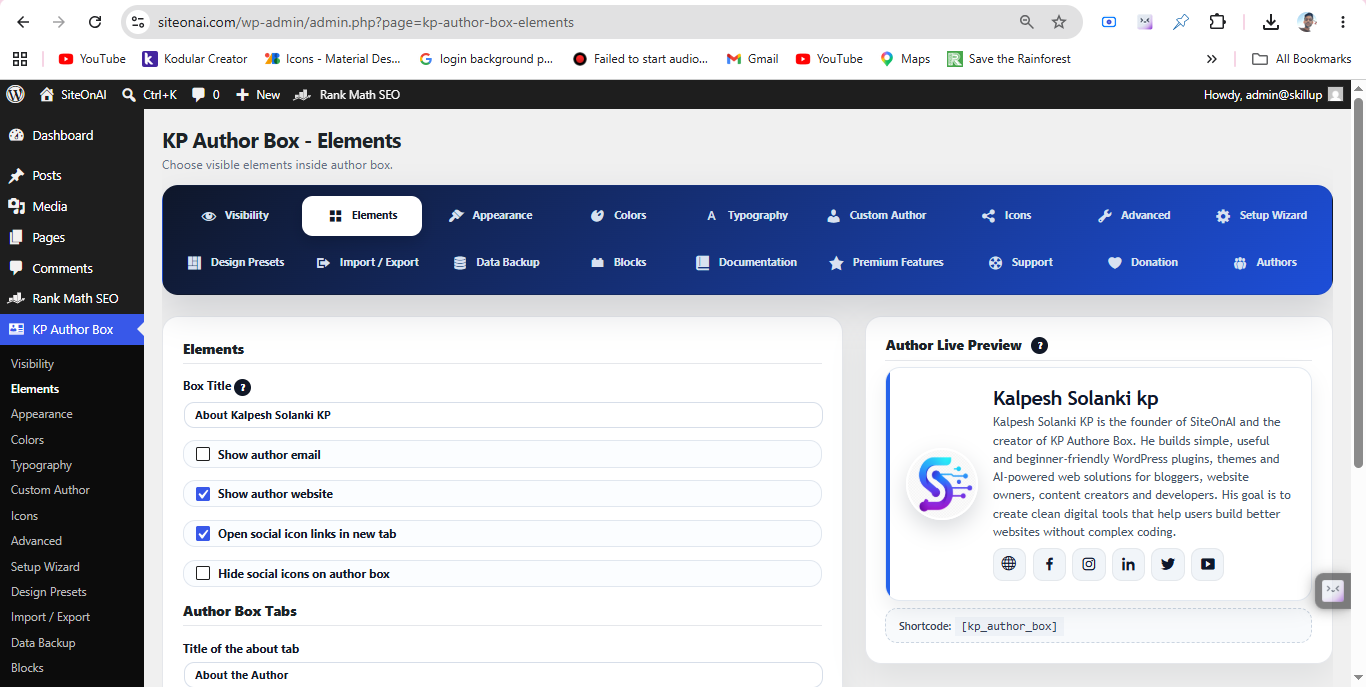
Visual Elements Settings
Manage author box visual elements, layout options, appearance settings and design controls from the plugin panel.
Step 5: Configure Elements Settings
Elements settings allow you to control what information appears inside the author box.
- Box title
- Author email
- Author website
- Social media icons
- Open social links in new tab
- Author box tabs
- Latest posts tab
- Custom HTML tab
Step 6: Customize Appearance
Appearance settings help you control the design of the author box. You can adjust spacing, border, avatar size, radius and layout style.
- Select design style such as Modern Card, Soft Card or Compact Inline.
- Set top and bottom margin.
- Set padding for inside spacing.
- Change border width and border style.
- Adjust avatar image size.
- Select round or square avatar style.
- Set box radius for modern rounded corners.
Recommended Appearance Values
Design Style: Modern Card
Top Margin: 35px
Bottom Margin: 35px
Padding: 28px top/bottom and 30px left/right
Border Width: 1px
Box Width: 100%
Box Radius: 20px
Avatar Size: 96px
Avatar Style: Round
Border Style: Solid
Setup Wizard
KP Authore Box includes a simple setup wizard that helps users configure the plugin quickly after activation.
Step 7: Set Colors and Typography
KP Authore Box includes color and typography settings so you can match the author box design with your website branding.
- Change author name color.
- Change bio text color.
- Change background color.
- Change border color.
- Change link color.
- Set font family, font size and font weight.
Step 8: Create Custom Authors
The Authors section lets you create, edit, delete and preview custom authors. This is useful when you want to show custom author profiles instead of default WordPress users.
- Open KP Authore Box → Authors.
- Add author name, job title and bio.
- Add avatar image or avatar URL.
- Add website and social media links.
- Save the author.
- Use preview button to check the author card design.
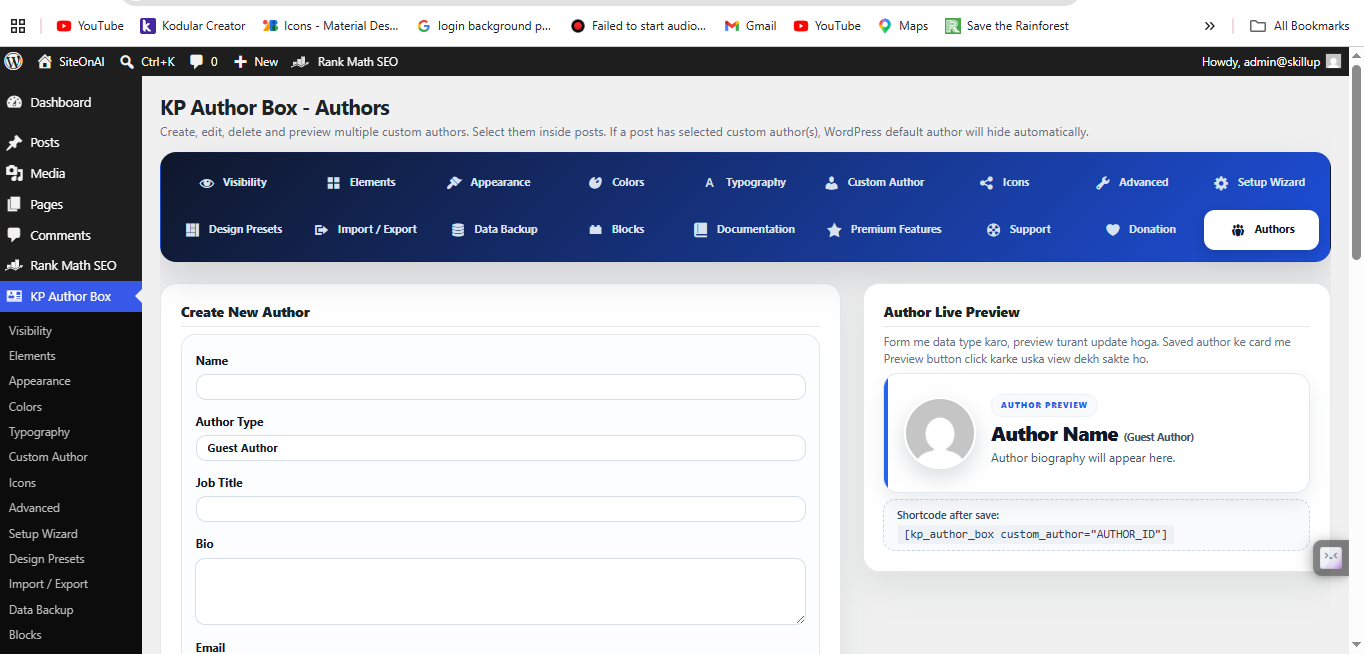
Multiple Custom Authors
Create multiple custom authors and display them with premium author box design layouts in WordPress posts and pages.
Step 9: Select Custom Author in Post or Page
After creating custom authors, you can select them inside the WordPress post or page editor.
Edit a Post or Page
Open any WordPress post or page where you want to show the author box.
Select Custom Author
Find the KP Custom Author Box section and select one or multiple custom authors.
Update the Post
Click update or publish. The selected custom author will appear on the frontend.
Multiple Custom Authors
Create multiple custom authors and display them with premium author box design layouts in WordPress posts and pages.
Step 10: Use Shortcodes
KP Authore Box supports shortcodes. These shortcodes are shown below for user reference only. You can copy and paste them inside a post, page, widget or template where you want to display the author box.
Default Author Box Shortcode
[kp_author_box]Custom Author Shortcode
[kp_author_box custom_author="AUTHOR_ID"]Multiple Custom Authors Shortcode
[kp_author_box custom_author_ids="1,2,3"]PHP Template Usage
<?php echo do_shortcode('[kp_author_box]'); ?>Step 11: Enable SEO Person Schema
KP Authore Box includes an optional SEO Person schema feature. This helps search engines understand author information such as name, website, avatar and social links.
- Open KP Authore Box settings.
- Go to Advanced settings.
- Enable SEO Person schema for single posts and pages.
- Save settings.
Step 12: Import and Export Settings
The Import / Export option helps you create a backup of plugin settings and custom author data. This is useful before deleting the plugin or moving settings to another website.
- Export plugin settings as JSON backup.
- Import settings from JSON file.
- Backup custom authors and plugin options.
- Restore settings if needed.
Data Safety: Deactivate vs Delete
KP Authore Box handles plugin data carefully so users understand what happens when the plugin is deactivated or deleted.
Deactivate Plugin
When you deactivate the plugin, settings, custom authors and post selections stay saved. This means you can reactivate the plugin later and continue using the same data.
Delete / Uninstall Plugin
When you delete or uninstall the plugin, WordPress removes KP Authore Box plugin data from the database. If you want to keep a backup, export JSON before deleting the plugin.
Recommended Settings for Best Result
Data Source: Use Custom Data
Auto Show Author Box: ON
Author Box Position: After Content
Show on Posts: ON
Show on Pages: ON
Hide on Archives: ON
Show Website: ON
Show Email: OFF
Open Social Links in New Tab: ON
Design Style: Modern Card
Avatar Style: Round
SEO Person Schema: ON
These settings create a clean, professional and SEO-friendly author box for most WordPress websites.
Frequently Asked Questions
Can I use KP Authore Box without coding?
Yes. KP Authore Box is made for normal WordPress users. You can manage author box settings from the WordPress admin area without coding.
Can I create custom authors?
Yes. You can create custom authors with name, bio, avatar, website and social links.
Can I show multiple authors?
Yes. You can select multiple custom authors for a post/page or use the multiple author shortcode.
Does the plugin support social links?
Yes. The plugin supports website, email and popular social media profile links.
What happens when I delete the plugin?
When you delete/uninstall the plugin, plugin data is removed from the WordPress database. Export a JSON backup before deleting if you want to save your settings.
Start Using KP Authore Box
Add a clean, responsive and professional author box to your WordPress posts and pages with custom author data, avatar, bio, website and social media links.